OSC SciPortal Main Toolkits
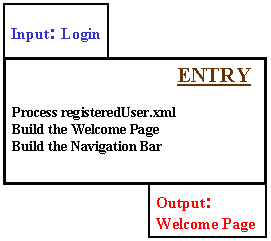
Section: Entry Toolkit
- INPUT
Access is from a login to the WebFlow system and selecting the
appropriate science area (such as CCM, which is currently the
default).
- OUTPUT
This toolkit generates the Welcome Page, the navigation
bar providing access to the different toolkits, authentication
for the PSE and a connection to a User Context.
The User Context may contain data from
previous activities.
|
|
The Entry to the discipline specific set of toolkits is done
using JSP (Java Server Page) to handle the login user ID and to
dynamically generate the Welcome page and the toolkit navigation.
The user ID provided at login to the WebFlow server allows WebFlow to
create or attach to a User Context and the PSE to read
the registeredUser XML file. This file
provides additional authentication for the discipline specific activities.
The entry process can be described as follow:
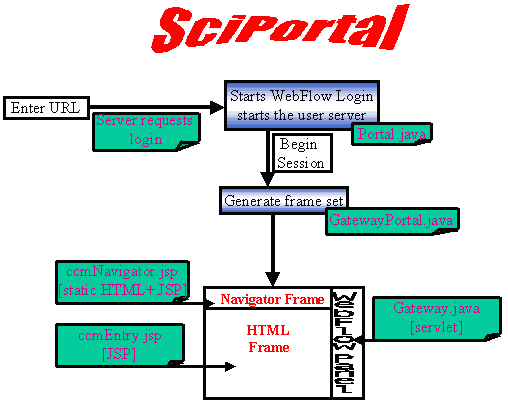
|
The user enters a URL and the server requests a login (user ID and
password). The server then calls the Portal servlet which
presents to the user the WebFlow login to begin a
WebFlow session (Start Session button). This starts
the access to a User Context and starts the
WebFlow user server (slave server). Once the User
WebFlow Server is running, the GatewayPortal servlet
generates the CTA frameset.
In the CORBA client gw.java, cases 0 and 101 refer to the
PDT, case 102 refers to the CT and
the case 103 refers to the AT.
|
Section: Problem Description Toolkit (PDT)
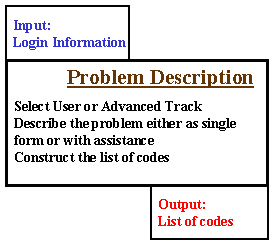
- INPUT
This toolkit needs only the user information which can contain
authorization information for applications and back end
resources. The PSE can at
this toolkit restore a previous Problem Description from either
the current user context or the archive. Access to the previous
problem descriptions for the current user context is done via a
set of radio buttons.
The current limitation for the
SciPortal is that the
PDT solves the science problem using a single
application code, single input with multiple output files.
The Problem Description context will also be the repository of the
XML file, named after the Problem Description title which will
contain information form the Code Toolkit and the Analysis Toolkit
as well as the Problem Description Toolkit.
- OUTPUT
A list of codes and associated Application
Descriptors (AD) which appear
in the navigator of the CT. This toolkit will
query the Code Information Server for information on the
availability of codes from the AAD.
The output will contain a code recommendation (or codes) plus
some description to enable the CT to select
a template input file.
|
|
Either of the toolkit tracks (Advanced or User)
generates an XML file which contains the Problem Description. The
PDT also updates the problem context data by adding a
pointer to the Problem Description XML file.
The Problem Description XML file contains:
- Title
- Problem information - such as properties, type of system, etc.
The User track assists the user with a decision process (which
the user sees as a set of interactive forms) to select a set of codes
(or only one code) to solve the specified problem. The decision process
is discipline specific but the templates for the forms and the decision
tree have been constructed for CCM.
The Advanced track provides a single form for the user to
specify the problem to solve. This advanced problem description relies
on the expertise of the user. The advanced problem description is used
primarily for archiving such that the PSE can recover
past activities.
The PDT can determine which code can handle the problem
described via the User track. The
advanced track user will select a code directly. The
code selection process also requires information concerning the
availability of the code. This information is supplied by the
AAD. One way to view this process is to consider that
the code selection is done based on WHAT the code can do and that the
availability of the code answers the question about HOW the code is
used.
The entry process can be described as follow:
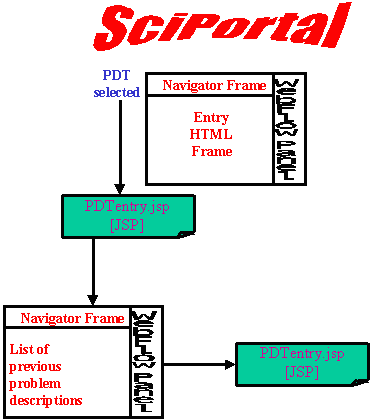
|
Selecting the Problem Description Toolkit button from
the main navigator. This invokes the probDescPage
servlet which will list the existing Problem Descriptions, if there
are any. This is accomplished using the Context Manager.
|
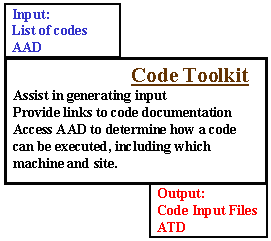
Section: Code Toolkit (CT)
- INPUT
A list of codes which appear in the CT
navigator. This list is constructed from a discipline specific
analysis to determine the code can solve the problem and are
available to the user.
In general the input is a file at some location of one of three
types:
- Template (selected with help from the PDT.
- A file uploaded from the client.
- An input file generated from an input form.
- OUTPUT
This toolkit will generate an ATD to allow
WebFlow to request back end resources. The ATD
contains information about the input file(s) (this is
application specific) and requested resource (machine).
|
|
This toolkit is dependent on several components.
- The AAD.
The AAD is maintained by the WebFlow system
administrator and keys off of the machine/code pair of values. The
AAD is part of the WebFlow system and is described
elsewhere.
The PSE uses the AAD to construct
the Application Descriptor
(AD) and then the Abstract
Application Descriptor
(ATD) which is how back end services are requested.
The AAD provides information to the
PSE about machines and sites.
- The CT can display the codes as a single row if
all codes are from a single site or a table listing both code and
site.
The advanced track will provide the user with the necessary
options for running a code. Information about the switches is in the
AAD. A tool to enter AAD information
is forthcoming.
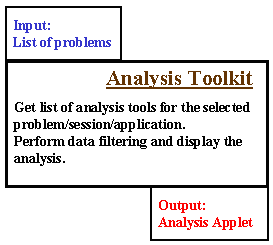
Section: Analysis Toolkit (AT)
|
Upon entry to the AT a list of problems, which is
accessed via the Context manager. The user selects a problem and the
list of sessions associated with the problem appears and after a
session is selected, the application context data is displayed.
This is the most general case, doing an analysis
after the applications have been run. Links from a session
and/or an application can be set up.
The AT needs to determine what analysis tools and
data filters are available for each application. This may be done
in the AAD or in the Code
Descriptor (CD)
|
|